Creating your own envelopes can be a fun and easy way to add your own little touch without spending a crazy amount of money. You can make them as elaborate or simple as you would like based on your budget. Doing it this way will add some uniqueness without spending a lot of money if you were to buy them elsewhere. In our case, we use them for our Disney trips each time we go – in this case with Mousekeeping envelopes!
But what are mousekeeping envelopes?
Disney does a lot to make sure that everyone has a magical time, so we try to continue this in our own way. For us, one thing we have gotten into the habit of bringing mousekeeping envelopes to use for tips. On a side note, deciding on the tip amount is up to you, we usually tip about $2 per person as we usually keep our room pretty tidy. We also prep by making an envelope for each night that we are there to keep the tips in.

But back to the task at hand.
This template can be used to create envelopes with whichever pattern you would like depending on material. For the envelopes, we use 2 main types of paper, either cardstock to help give it some stiffness or with scrapbooking paper to get more creative designs. Creating the envelope doesn’t take a long time to do with a Cricut or Silhouette but can take a little longer with scissors. We have used the same template in the past, which takes time but doable. For the purpose of this post, we will create a DIY for both software and freehand. With either method, it does not take too long at all.
Silhouette or Cricut software
Step 1
Download the template and load it into Silhouette/Cricut software. From here you can adjust the size based on needs
Step 2
Select trace area then trace out edge option and lift. You can then delete the underlying image.

Step 3
Pick out the paper you’d like to use for the envelope and apply this to the cutting sheet.

Step 4
Load cutting sheet, send file and cut

Freehand envelopes
Step 1
Download the template and print this on regular paper
Step 2
Cut out the template and choose which cardstock or scrapbook paper you would like
I usually recommend taping down the template to make sure that it does not shift very much.
Step 3
Trace onto the cardstock paper you’d like for your envelopes

Step 4
Cut out the traced area on the cardstock
Making the envelope
Step 5
Fold along the right edges to create 4 flaps. The easiest way is to take a ruler to make sure that the lines are straight.

Step 6
Glue or use double sided tape to secure the side flaps to the bottom flap.
Let them dry
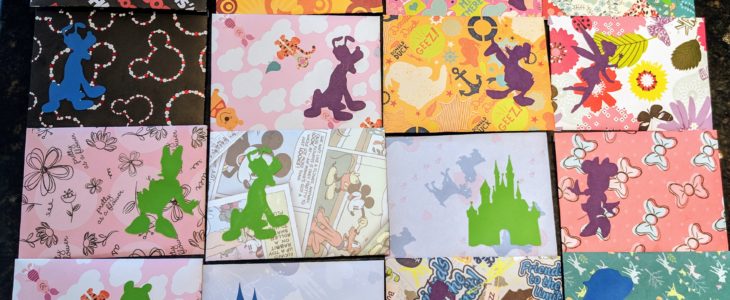
Decorate the outsides

You have the option to decorate them with stickers or create other silhouette options to glue them to the front of the mousekeeping envelopes. You can decide how elaborate or simple your envelopes are. The possibilities are endless. This could be a good time to get the kids involved to help decorate!

The mousekeeping envelopes is now done! All you have to do after they are dried is fill them with invites or money for mousekeeping tips. This can be a great way to customize birthday invitations as well!
What would you use them for?